In modern manufacturing, single-material parts rarely meet the full demands of performance, aesthetics, and functionality.
Today’s products must be durable yet comfortable, waterproof yet breathable, and complex yet easy to assemble.
This has driven the widespread adoption of multi-material manufacturing processes. Among these, overmolding and insert molding are two of the most important and frequently compared techniques.
Although the two terms are sometimes used interchangeably, they describe different manufacturing approaches and solve different engineering problems.
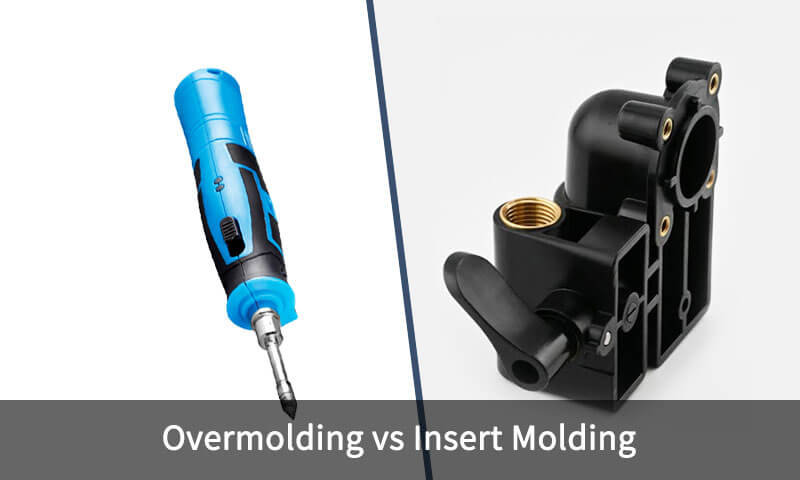
Overmolding generally involves molding a second material over an existing substrate to create a multi-material component.
Insert molding, by contrast, places a preformed insert—often metal—inside an injection mold and encapsulates or partially surrounds it with plastic.
This article provides a comprehensive, side-by-side comparison of overmolding and insert molding.
1. What Is Overmolding?
Overmolding is an injection molding process in which one material is molded over an existing substrate or previously molded component to create an integrated multi-material part.
The first component is commonly referred to as the substrate, while the material applied during the secondary molding operation is the overmold material.
Depending on the product design, the substrate may be a rigid thermoplastic, elastomer, metal component, or another suitable preformed part.
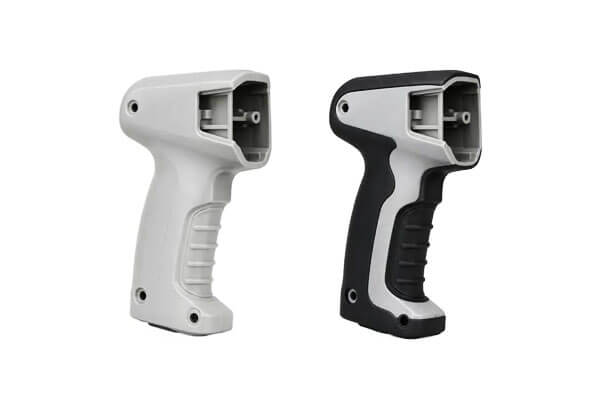
A typical overmolded component may combine a rigid structural material with a softer material.
For example, a rigid ABS housing can receive a TPE overmold to provide a comfortable grip, improve sealing, or create a protective exterior surface.
The objective is not simply to place one material on top of another. The interface between the two materials must provide adequate adhesion, mechanical retention, or a combination of both to withstand the product’s expected mechanical, thermal, chemical, and environmental conditions.
How Overmolding Works
The overmolding process generally begins with production of the substrate.
This may involve a separate injection molding operation, machining process, stamping operation, die casting process, or another manufacturing method.
After the substrate is inspected, it is positioned inside a second mold. The mold is designed to expose the areas that need to receive the overmold material while accurately locating and supporting the substrate.
The secondary material is then heated to the appropriate processing temperature and injected into the mold cavity.
It flows around the designated substrate surfaces and forms the required outer geometry.
After filling and packing, the material cools and solidifies before the completed component is ejected.
A typical workflow is:
Substrate production → substrate inspection → mold loading → positioning → secondary material injection → packing → cooling → ejection → inspection
The quality of the final product depends heavily on interface design. If chemical adhesion is required, the substrate and overmold material must have sufficient compatibility.
If mechanical retention is the primary mechanism, the substrate may require grooves, ribs, holes, undercuts, or other features that allow the second material to lock into position.
Surface contamination is another important consideration. Oil, dust, release agents, oxidation, moisture, or other contaminants can interfere with adhesion and lead to delamination or premature separation.
Common Overmolding Materials
Overmolding can use a broad range of thermoplastics and elastomeric materials, but not every material combination is inherently compatible.
Material selection should consider melt temperature, chemical compatibility, shrinkage, coefficient of thermal expansion, hardness, flexibility, surface characteristics, and expected service conditions.
Common combinations include:
| Substrate Material | Overmold Material | Typical Purpose |
| ABS | TPE | Soft-touch housings and grips |
| PC | TPE | Impact-resistant products with ergonomic surfaces |
| Nylon | TPE/TPU | Industrial grips and flexible interfaces |
| PP | TPE | Consumer products and seals |
| PC/ABS | TPU | Protective and ergonomic surfaces |
| Rigid thermoplastic | LSR | Sealing and specialized flexible components |
Typical Overmolding Applications
Overmolding is particularly useful when the product must combine structural performance with softness, flexibility, sealing, insulation, or improved ergonomics.
Overmolding is commonly used for:
- Hand-tool grips
- Automotive switches and controls
- Consumer electronics housings
- Medical device components
- Wearable devices
- Cable and wire protection
- Sealing components
- Handles and ergonomic interfaces
- Protective covers
- Industrial equipment controls
2. What Is Insert Molding?
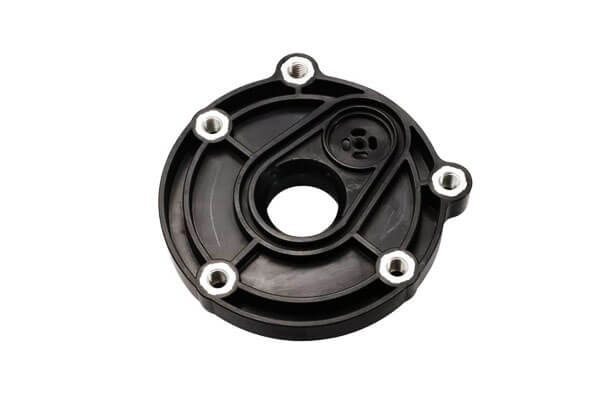
Insert molding is an injection molding process in which a preformed component, known as an insert, is positioned inside an injection mold and then partially or completely encapsulated by molten plastic.
The insert is often made from metal, although plastic, ceramic, electronic, and other preformed components can also be used.
Unlike conventional single-material injection molding, insert molding combines an independently manufactured component with injected plastic during one molding operation.
The plastic solidifies around the insert, producing an integrated part that can eliminate subsequent assembly operations.
For example, a brass threaded insert can be positioned inside a mold and surrounded by nylon.
After molding, the resulting component contains a permanent threaded metal interface without requiring the threaded insert to be installed afterward.
How Insert Molding Works
Insert molding begins with manufacturing and inspecting the insert. Dimensional accuracy is particularly important because the insert must fit correctly within the mold and maintain its specified position throughout injection.
The insert is then placed into the mold manually, semi-automatically, or through an automated loading system.
Dedicated fixtures, pins, cavities, or retention features may be used to prevent movement.
Once the mold closes, molten plastic is injected around the insert. Injection pressure can be substantial, so the mold must provide sufficient support to prevent the insert from shifting, deforming, or becoming misaligned.
The plastic then cools and solidifies around the insert. After ejection, the finished component is inspected for dimensional accuracy, insert position, flash, voids, cracks, and other defects.
The basic sequence is:
Insert manufacturing → insert inspection → insert loading → positioning and retention → mold closing → plastic injection → cooling → ejection → inspection
For high-volume manufacturing, automated insert loading can be integrated into the molding cell. This can improve cycle consistency while reducing manual handling.
Common Insert Materials
Metal is the most widely recognized insert material because it provides properties that plastics generally cannot reproduce, such as high electrical conductivity, thread durability, stiffness, wear resistance, or localized mechanical strength.
Common insert materials include:
- Brass
- Stainless steel
- Carbon steel
- Aluminum
- Copper and copper alloys
- Engineering plastics
- Ceramics
- Electronic components
Typical Insert Molding Applications
Insert molding is commonly used when a product requires a metal or other preformed component to be permanently integrated into a plastic body.
Typical applications include:
- Threaded bosses
- Electrical connectors
- Automotive terminals
- Sensor housings
- Switch components
- Medical instruments
- Structural reinforcement components
- Cable connectors
- Electronic assemblies
- Precision mechanical components
3. Overmolding vs Insert Molding: What Is the Difference?
Although both technologies integrate multiple materials or components, their manufacturing logic is different.
The simplest distinction is:
Overmolding adds a new material over an existing substrate, while insert molding encapsulates or surrounds a preformed insert with injection-molded plastic.
However, the terminology can overlap. In some manufacturing contexts, insert molding may be discussed as a broader form of overmolding because both involve molding material around a preexisting component.
For engineering communication, however, it is useful to distinguish them based on the role of the preexisting component.
Overmolding vs Insert Molding Comparison
| Factor | Overmolding | Insert Molding |
| Primary purpose | Combine different material properties | Integrate a preformed insert into plastic |
| Preexisting component | Substrate | Insert |
| Common substrate/insert | Plastic, elastomer, metal | Metal, plastic, ceramic, electronic component |
| Typical combination | Rigid plastic + elastomer | Plastic + metal |
| Main interface mechanism | Adhesion, mechanical interlocking, or both | Encapsulation, mechanical retention, adhesion in some cases |
| Key design concern | Material compatibility | Insert positioning and retention |
| Typical application | Soft-touch grip | Threaded metal insert |
| Surface function | Grip, seal, cushion, protection | Electrical, mechanical, structural, fastening |
| Automation | Highly automatable | Highly automatable, but insert loading is critical |
| Major risk | Delamination or poor bonding | Insert movement or misalignment |
4. Overmolding vs Insert Molding: Design Considerations
The design requirements for overmolding and insert molding differ primarily because the two processes manage different interfaces.
Overmolding focuses on creating a reliable interface between the substrate and the overmolded material, while insert molding focuses on accurately positioning and securely encapsulating a preformed insert.
| Design Consideration | Overmolding | Insert Molding |
| Material Compatibility | Select compatible substrate and overmolding materials based on adhesion, melting temperature, shrinkage, hardness, and thermal expansion. | Ensure the insert can withstand molding temperature and pressure without deformation or dimensional instability. |
| Geometry & Wall Thickness | Maintain uniform overmold thickness and provide sufficient bonding area. Avoid abrupt thickness changes that can cause shrinkage, warpage, or weak bonding. | Provide sufficient plastic thickness around the insert for strength and use grooves, knurls, holes, or shoulders when additional retention is required. |
| Bonding & Retention | Design the interface for chemical adhesion, mechanical interlocking, or both, depending on material compatibility. | Design mechanical retention and encapsulation features to resist pull-out and rotation. |
| Gate & Material Flow | Position gates to achieve balanced filling and minimize weld lines, air entrapment, and excessive stress at the interface. | Control material flow carefully to prevent insert displacement, incomplete encapsulation, or excessive pressure on the insert. |
Insert / Substrate Positioning |
The substrate must be accurately located and securely held during injection. | Precise insert positioning is critical; locating pins, pockets, fixtures, or automated placement may be required. |
| Shrinkage & Thermal Expansion | Consider differences in shrinkage and thermal expansion between the substrate and overmold to prevent warpage, residual stress, and delamination. | Consider thermal expansion differences between the insert and polymer, particularly in metal-to-plastic applications, to prevent dimensional variation and internal stress. |
| Draft & Ejection | Provide adequate draft and properly positioned ejectors to release the part without damaging the overmold or interface. | Design draft and ejection carefully to prevent insert movement, deformation, or loosening during demolding. |
Tolerances |
Account for substrate dimensions, overmold thickness, material shrinkage, and possible interface movement. | Account for insert dimensions, positioning accuracy, polymer shrinkage, and final insert location. |
| DFM & Mold Flow | Evaluate bonding area, material flow, wall thickness, gate location, and differential shrinkage before tooling. | Evaluate insert retention, positioning, polymer flow, thermal behavior, and potential insert displacement before tooling. |
| Quality Control | Focus on bonding strength, overmold thickness, flash, delamination, warpage, and dimensional accuracy. | Focus on insert position, retention strength, encapsulation, flash, voids, and dimensional accuracy. |
5. Custom Overmolding and Insert Molding Services From LangHe Industry
LangHe Industry provides customized injection molding solutions for applications that require overmolding, insert molding, and other integrated molding technologies.
Our manufacturing approach can support projects from initial product development and tooling through production and quality inspection.
| Capability | Details |
| Overmolding Types | Two-shot (2K) overmolding, pick-and-place overmolding. |
| Insert Molding | Metal inserts (brass, steel, copper), ceramic inserts, electronic inserts (PCBs, sensors). |
| Materials (Substrate) | ABS, PC, Nylon (PA6, PA66), PP, PBT. |
| Materials (Overmold) | TPE, TPU, LSR, TPV, silicone. |
| Tooling | In-house tooling design and manufacturing. |
| Quality | ISO 9001:2015 certified; 100% inspection. |
| Lead Time | 2–4 weeks for prototypes; 4–8 weeks for production tooling. |
6. Conclusion
Overmolding vs insert molding is not a matter of determining which process is universally better. Both are highly effective injection molding technologies, but they address different product-development requirements.
Overmolding is primarily suited to products that need to combine different material characteristics within one integrated component.
It is particularly valuable for soft-touch surfaces, ergonomic grips, flexible seals, cushioning, insulation, and protective layers.
Its success depends heavily on material compatibility, interface design, adhesion, mechanical interlocking, and differential shrinkage control.
Insert molding, in contrast, is especially effective when a preformed component—often a metal insert—must be permanently integrated into a plastic structure.
It is widely suited to threaded interfaces, electrical terminals, reinforcement components, sensors, connectors, and other applications where plastic and another material perform complementary functions.
Ultimately, process selection should be based on the entire manufacturing system, including material behavior, product geometry, tooling, bonding or retention strategy, production volume, automation, inspection, and lifecycle cost.
FAQs
What is the difference between insert molding and two-shot molding?
Insert molding uses a preformed insert that is placed into the mold before plastic injection.
Two-shot molding typically produces two materials sequentially using specialized tooling and multiple injection stages, often without manually loading a separately manufactured substrate between shots.
Which process is faster: overmolding or insert molding?
Insert molding is generally faster because it uses a single injection shot. Overmolding requires two shots or a multi-step process.
Which process has lower tooling costs?
Insert molding has lower tooling costs because it only requires a single mold cavity. Overmolding requires two separate molds or a complex two-shot mold.
When should I use overmolding?
Use overmolding when you need soft-touch grips, waterproof sealing, vibration dampening, or improved aesthetics.
When should I use insert molding?
Use insert molding when you need high-strength threaded connections, electrical conductivity, or structural reinforcement in plastic parts.
Can overmolding and insert molding be used together?
Yes. Some complex parts combine both processes—for example, an insert-molded metal thread with an overmolded soft-touch grip on the same component.
Is insert molding a type of overmolding?
The terminology can overlap because both processes mold material around a preexisting component.
However, in practical manufacturing terminology, overmolding usually emphasizes adding another material layer or material system, while insert molding specifically emphasizes embedding a preformed insert into the molded component.
Can metal be used in overmolding?
Yes. Metal substrates can be overmolded with suitable plastics or elastomers.
However, the process must account for surface preparation, thermal expansion, adhesion, mechanical retention, and differential shrinkage.